Ultimate SSH Key Configuration Guide for Secure VM Access
Contents
- 1 SSH Key Configuration to Connect with VM
- 1.1 What Is SSH Key Authentication?
- 1.2 Why Use SSH Keys for VM Connections?
- 1.3 Generate an SSH Key Pair
- 1.4 Copy the Public Key to the VM
- 1.5 Configure SSH Key Permissions
- 1.6 Connect to the VM Using the SSH Key
- 1.7 Configure an SSH Client Alias
- 1.8 Common SSH Key Configuration Problems
- 1.9 SSH Keys in DevOps and CI/CD
- 1.10 Best Practices for Secure VM Access
- 1.11 Conclusion
SSH Key Configuration to Connect with VM
SSH key Configuration provides a secure and convenient way to connect to a virtual machine without repeatedly entering a password. SSH, or Secure Shell, uses a cryptographic key pair consisting of a private key and a public key. The public key is placed on the VM, while the private key remains securely stored on the client computer. This method is widely used by DevOps engineers, cloud administrators, developers, and system administrators to manage Linux virtual machines.
What Is SSH Key Authentication?
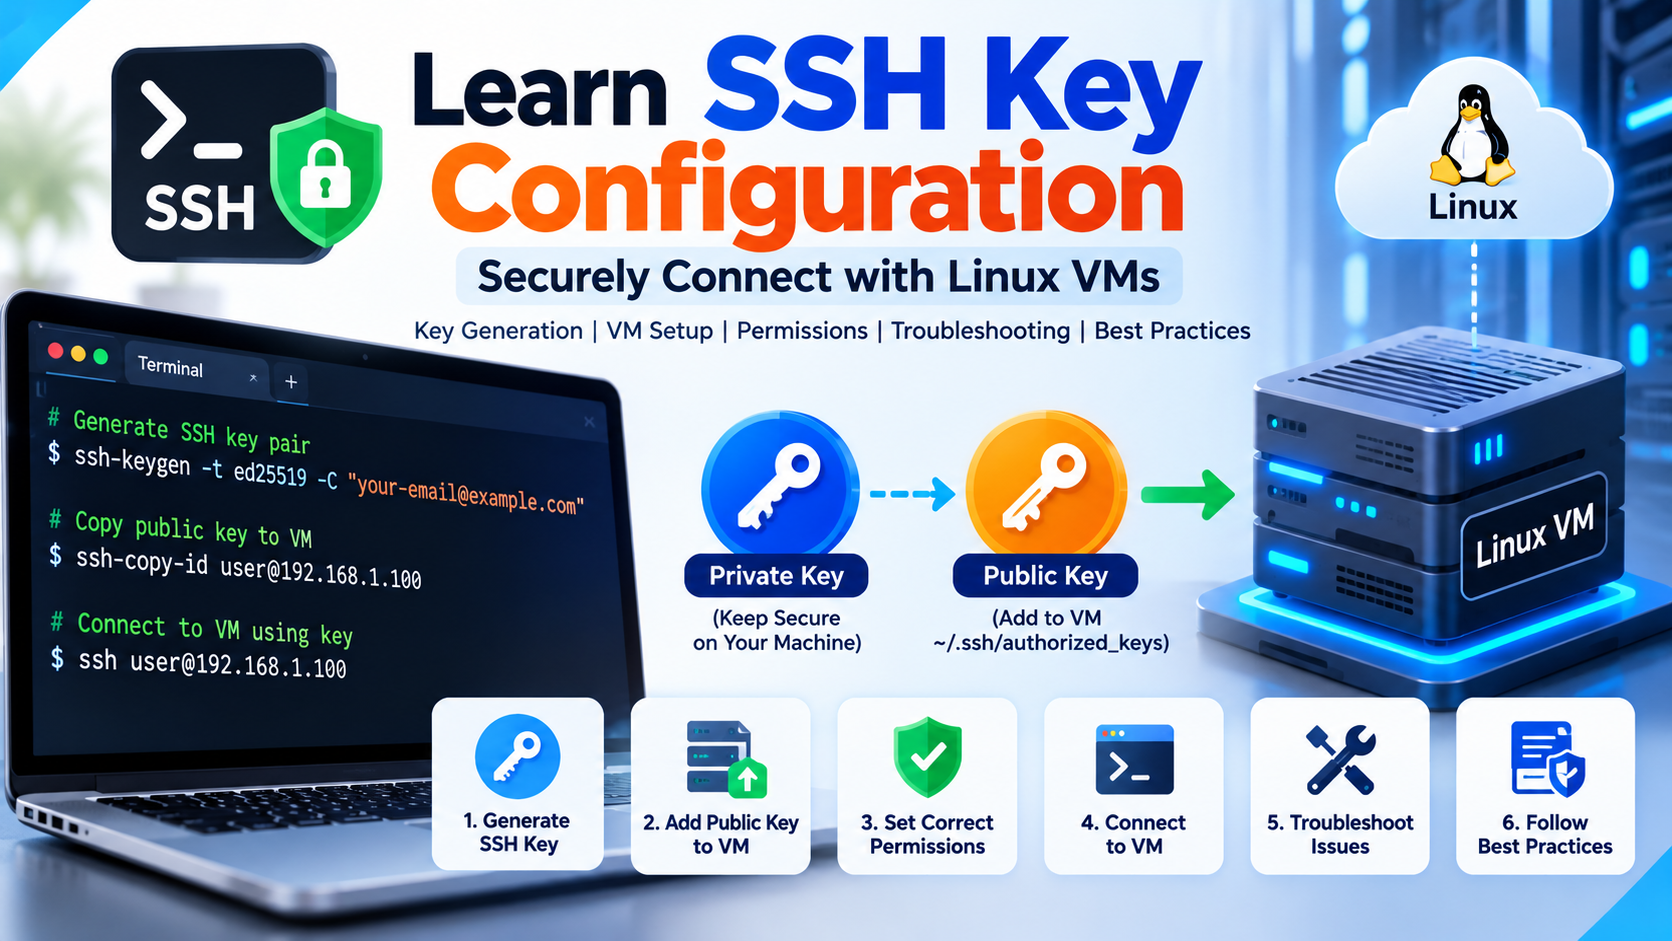
SSH key authentication uses two mathematically related keys. The public key can safely be copied to the VM, while the private key should never be shared. During authentication, the SSH client proves that it possesses the private key corresponding to the public key stored on the server.
- Private key: Stored securely on your local computer.
- Public key: Added to the VM’s authorized SSH keys.
- SSH server: Validates the authentication request.
- SSH client: Initiates the connection from your computer.
Unlike password authentication, the private key itself is not transmitted to the remote VM. This makes properly configured key-based authentication a strong option for administrative and automated access.
Why Use SSH Keys for VM Connections?
For cloud and DevOps environments, SSH keys provide several practical advantages over traditional password-based authentication.
- Passwordless login after initial configuration.
- Better support for automated deployment and CI/CD systems.
- Reduced dependence on shared passwords.
- Easy access management by adding or removing public keys.
- Compatibility with Linux servers, cloud VMs, containers, and automation tools.
SSH keys are particularly useful when administrators need to connect to multiple servers regularly or when tools such as Jenkins, Ansible, and deployment scripts need controlled SSH access.
Generate an SSH Key Pair
The first step in SSH key Configuration is generating a key pair on the client computer. Modern OpenSSH installations support several key types. Ed25519 is a commonly recommended choice for new configurations.
ssh-keygen -t ed25519 -C "your-email@example.com"When prompted, choose a secure location for the key and consider protecting the private key with a passphrase.
The command normally creates two files:
~/.ssh/id_ed25519
~/.ssh/id_ed25519.pub
oc_sk_212256d69f66_TZPHeOthQZahcwFoDNWkFmlF-gwUrVdA
The file ending in .pub is the public key. The file without .pub is the private key and must be protected.
Copy the Public Key to the VM
After generating the keys, the public key needs to be added to the VM. If password-based SSH access is currently available, the ssh-copy-id command is a convenient method on many Linux systems.
ssh-copy-id username@VM_IP_ADDRESSFor example:
ssh-copy-id ubuntu@192.168.1.100The command adds the public key to the user’s SSH authorization file on the VM.
If ssh-copy-id is unavailable, the public key can be added manually.
cat ~/.ssh/id_ed25519.pubCopy the complete output and add it to:
~/.ssh/authorized_keyson the VM for the appropriate user.
Configure SSH Key Permissions
Correct permissions are an important part of SSH key Configuration. SSH may reject keys when private-key or authorization-file permissions are too permissive.
On the VM, run:
chmod 700 ~/.ssh
chmod 600 ~/.ssh/authorized_keys
On the client machine, protect the private key:
chmod 600 ~/.ssh/id_ed25519The exact ownership and permissions may vary depending on the operating system and SSH configuration, but the general principle is simple: unauthorized users should not be able to modify or read SSH authentication files.
Connect to the VM Using the SSH Key
Once the public key is installed, connect to the VM using:
ssh username@VM_IP_ADDRESSIf the private key is stored under a different filename, specify it using the -i option:
ssh -i ~/.ssh/my-vm-key username@192.168.1.100For a custom SSH port:
ssh -i ~/.ssh/my-vm-key -p 2222 username@192.168.1.100A successful connection should open a shell on the VM without requiring the VM account password, although you may be prompted for the private-key passphrase.
Configure an SSH Client Alias
When managing multiple VMs, repeatedly typing IP addresses and key paths can become inconvenient. The SSH client configuration file provides a cleaner solution.
Edit:
~/.ssh/configAdd an entry such as:
Host production-vm
    HostName 192.168.1.100
    User ubuntu
    IdentityFile ~/.ssh/id_ed25519
You can then connect using:
ssh production-vmThis approach is particularly useful for DevOps engineers working with development, staging, and production environments.
Common SSH Key Configuration Problems
Incorrect permissions, wrong usernames, network restrictions, and missing public keys are among the most common causes of SSH connection failures.
- Permission denied (publickey): Verify that the correct public key exists in
authorized_keys. - Wrong username: Confirm the default VM user, such as
ubuntu,ec2-user, or another configured account. - Private key permissions: Ensure the private key is not accessible to unauthorized users.
- Firewall restrictions: Confirm that the VM allows SSH traffic on the required port.
- Incorrect key: Use the correct private key corresponding to the public key installed on the VM.
For detailed troubleshooting, use verbose SSH output:
ssh -v username@VM_IP_ADDRESSFor more detailed debugging:
ssh -vvv username@VM_IP_ADDRESSThe verbose output can reveal whether the client is loading the expected private key, reaching the SSH server, and attempting the correct authentication method.
SSH Keys in DevOps and CI/CD
SSH key Configuration becomes especially important when automated systems need to access servers. Jenkins, Ansible, deployment scripts, and other automation tools can use SSH credentials to connect to remote infrastructure.
For example, a Jenkins deployment pipeline might use an SSH key to transfer a Laravel application to a production VM and execute deployment commands.
- Store private keys in a secure credential manager.
- Never commit private keys to Git repositories.
- Use dedicated deployment accounts where appropriate.
- Limit permissions for automation users.
- Rotate keys according to your organization’s security requirements.
Best Practices for Secure VM Access
A secure SSH key Configuration should go beyond simply generating a key pair. The entire SSH access process should be designed around least privilege and credential protection.
- Use Ed25519 keys for new deployments where supported.
- Protect private keys with strong passphrases.
- Disable direct root SSH login when appropriate.
- Restrict SSH access through firewalls or security groups.
- Use dedicated accounts instead of sharing administrator credentials.
- Remove public keys when users or systems no longer require access.
- Keep OpenSSH and the VM operating system updated.
- Monitor authentication logs for suspicious activity.
Conclusion
SSH key Configuration is one of the fundamental skills for securely managing virtual machines and modern infrastructure. By generating a secure key pair, installing the public key on the VM, protecting private-key permissions, and configuring the SSH client correctly, administrators can establish reliable passwordless authentication.
For individual developers, SSH keys simplify everyday VM access. For DevOps teams, they provide an important foundation for automation platforms such as Jenkins and Ansible. The strongest implementation combines properly protected keys with least-privilege accounts, firewall restrictions, credential rotation, monitoring, and secure automation practices.
Once the fundamentals are configured correctly, connecting to a VM becomes as simple as running ssh username@server, while maintaining a much more manageable authentication workflow for modern cloud and infrastructure environments.